How to Set Up a Let’s Encrypt Certificate for Plex Media Server using a DNS Challenge
Serving your Plex Media Server over HTTPS ensures that your media streams securely to your devices. Let’s Encrypt offers free SSL/TLS certificates that can be integrated into Plex. Here’s a step-by-step guide to set this up:
Step 1: Prerequisites
Before getting started, ensure you have:
- A domain name.
- Access to the server where Plex Media Server is installed.
- Administrative privileges on the server.
- Basic knowledge of the terminal (for Linux-based servers).
Step 2: Install Certbot
Certbot is a tool provided by the Electronic Frontier Foundation (EFF) to easily generate Let’s Encrypt certificates.
Update your package manager:
sudo apt update
sudo apt upgrade
Install Certbot:
sudo apt install certbotThe above instructions are for Ubuntu/Debian.
For other operating systems, consult the Certbot installation instructions.
Step 3: Installing acme-dns-certbot
Start by downloading a copy of the script:
wget https://github.com/joohoi/acme-dns-certbot-joohoi/raw/master/acme-dns-auth.pyChange the script permissions:
chmod +x acme-dns-auth.pyThen, edit the file using your favorite text editor and adjust the first line in order to force it to use Python 3:
nano acme-dns-auth.pyAdd a 3 to the end of the first line:
#!/usr/bin/env python3
. . .
This is required in order to ensure that the script uses the latest supported version of Python 3, rather than the legacy Python version 2.
Once complete, save and close the file.
Finally, move the script into the Certbot Let’s Encrypt directory so that Certbot can load it:
sudo mv acme-dns-auth.py /etc/letsencrypt/Step 4: Request a certificate using certbot and acme-dns-auth
Now that we have all in place, we can request the new certificate using certbot and acme-dns-auth using a DNS challenge.
sudo certbot certonly --manual --manual-auth-hook /etc/letsencrypt/acme-dns-auth.py --preferred-challenges dns --debug-challenges -d your-domain.comAfter running the above command, you will get something like this:
Saving debug log to /var/log/letsencrypt/letsencrypt.log
Requesting a certificate for *.your-domain.com
Hook '--manual-auth-hook' for your-domain.com ran with output:
 Please add the following CNAME record to your main DNS zone:
 _acme-challenge.your-domain.com CNAME 48a2f6b4-3541-4053-cghf-8392805d8748.auth.acme-dns.io.

- - - - - - - - - - - - - - - - - - - - - - - - - - - - - - - - - - - - - - - -
Challenges loaded. Press continue to submit to CA. Pass "-v" for more info about
challenges.
- - - - - - - - - - - - - - - - - - - - - - - - - - - - - - - - - - - - - - - -
Press Enter to Continue
You will now need to go to your DNS provider and create the DNS record described above:_acme-challenge.your-domain.com CNAME 48a2f6b4-3541-4053-cghf-8392805d8748.auth.acme-dns.io.
Once the record is in place, click Enter and wait for the certificate to be provisioned and downloaded.
Step 5: Export the new certificate to a "Plex friendly" format
The below code for openssl will take the cert data, the private key and the certificate chain and export it in pkcs12 format:
sudo openssl pkcs12 -export -out ~/plex_certificate.pfx \
    -inkey /etc/letsencrypt/live/your-domain.com/privkey.pem \
    -in /etc/letsencrypt/live/your-domain.com/cert.pem \
    -certfile /etc/letsencrypt/live/your-domain.com/chain.pem
This will ask you for your sudo password and an export passkey.
Make sure you choose a key that you're comfortable having stored in plain text in your Plex server.
All that is left to do is to move the new cert to its final destination.
sudo mv ~/plex_certificate.pfx /var/lib/plexmediaserver/certs
Note: you can change the path where the certificate will be stored, just make sure you take note of it.
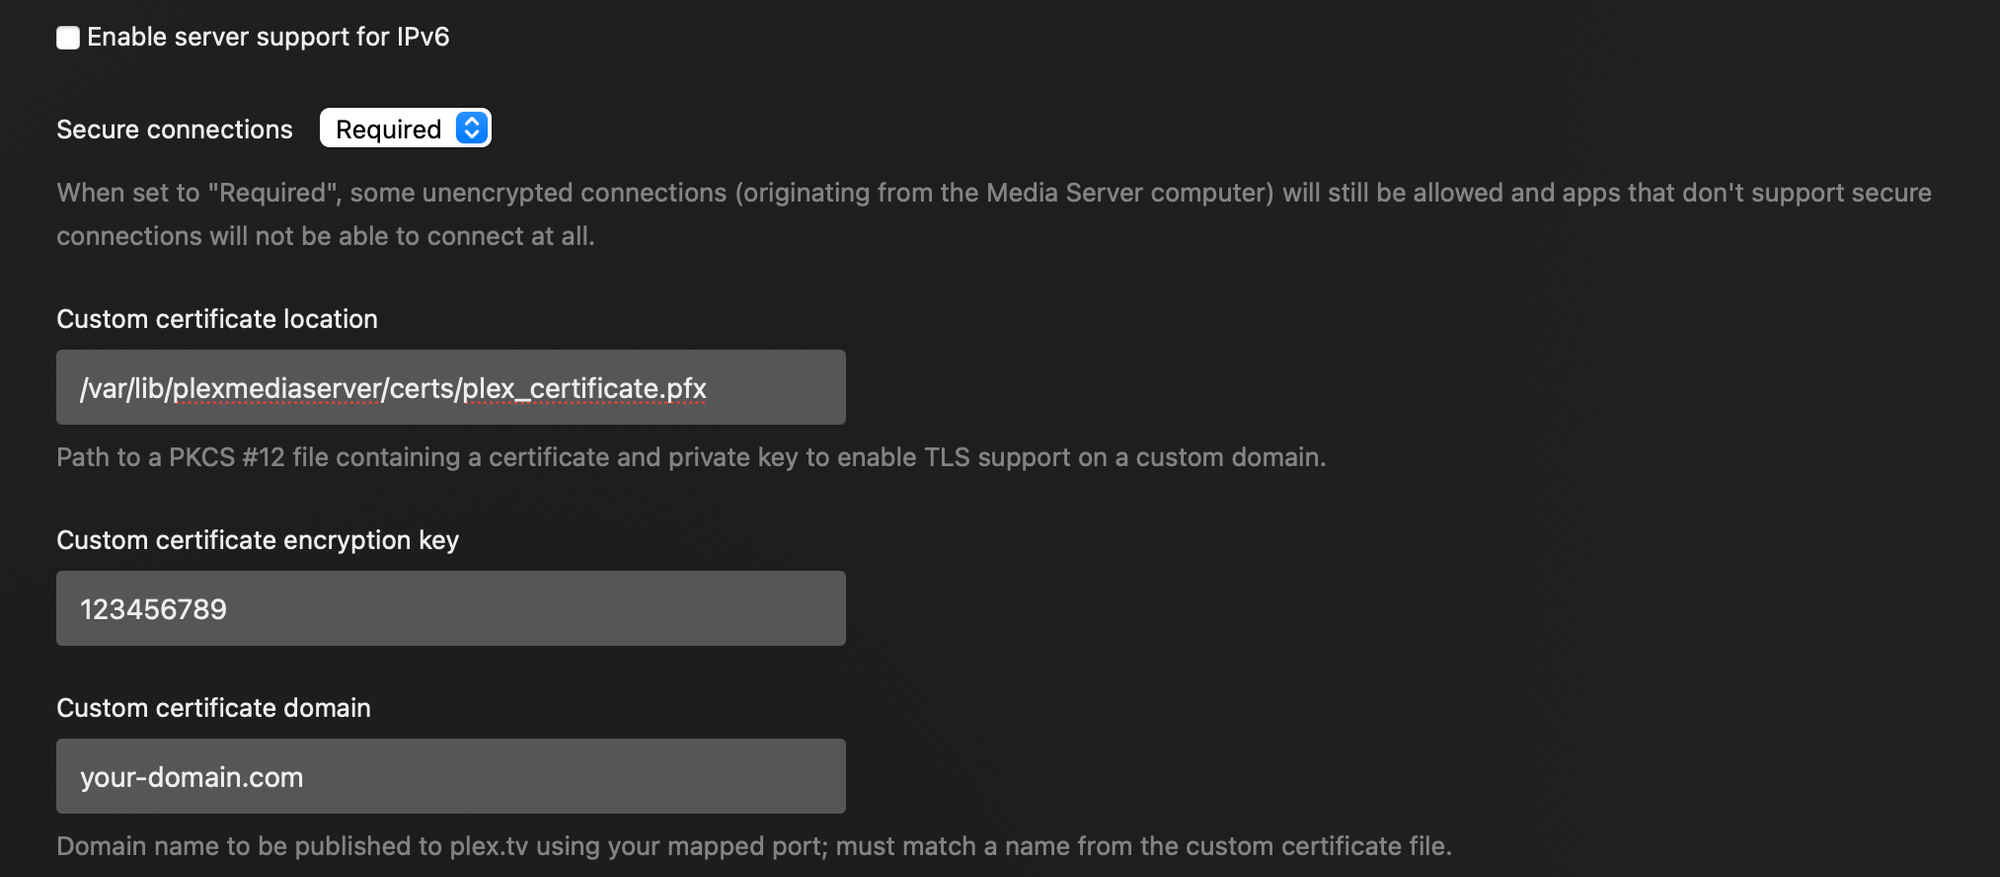
Step 6: Configure Plex to use the new certificate to serve secure requests
Navigate to your Plex > Settings > Network and edit with the details of your certificate: